Welcome everyone to the second devlog from Outhoused Studios, on our latest game, Echoes in the Deep. In this devlog, we'll be taking a look at the flow our resident master at AI-generated background art, Ivan, is using to make our beautiful dark fantasy visuals.
Note that as this is a flow intended to find images for a background to our game, we will be generating horizontal images.
On the tools used
For our MVP phase (what we could also refer to as pre-alpha) we're using an online tool called Playground. We're using this tool as paid users.
This tool has a lot of advantages for our use case, namely
- allowing you to freely use the image-generating model you train on their site, as well as locally
- providing a series of easy-to-use AI image editing tools
- auto-saving changes made to both model and images, so if ever connection is lost there's no need to manually re-apply everything
Overview of the flow
The flow is broken down into the following steps
- Creating the image
- We create a prompt that will be used to generate an image that suits our setting
- Using our prompt, generate a series of small low-resolution images
- We select whichever image best suits our needs
- Upscaling and cleaning the image
- We remove any imperfections on the image, and use AI tools to fill the gaps
- We split our image into a series of squares, to be individually upscaled
- Upscale the squares
- We recombine our upscaled squares and eliminate the seams between the squares
At this point we have obtained a beautiful high-definition background image that suits our esthetic.
Creating the prompt used to generate the image
When creating the prompt used to create the image, it's important to use as specific a prompt as possible, while noting that playing with the order in which you mention certain details can affect where those details are placed in the image. For instance, the closer to the beginning of the prompt some detail is, the more well defined it will be in the resulting image.
In the devlog, Ivan uses a prompt that specifically mentions a variety of details, and even artists and art styles, in order to really refine the vibe we're going for with our art.
Generating a series of small low-resolution images
For our purposes, it's fine to generate relatively low-resolution series of four images, and from there we can select which is best. In our devlog, we go through several iterations of generation before finally settling on an image that we find both interesting artistically, and with respect to our game's esthetic. We also choose our image knowing that it will be a good image to apply simple visual effects to, like clouds flowing by, or flames dancing.
Selecting the image
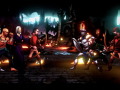
Finding the right generated image is itself an art. We selected as criteria that we wanted something against which a battle could take place, that has a dark gothic castle and that was visually interesting with respect to the balance of colours in the scene.
Removing imperfections on the image
Imperfections we had on the image we chose revolved around there being religious symbols on our chosen image, and on there being some rocks closer to the viewer. We want our background to be properly behind the action, so obviously we needed to remove those pesky close-up pebbles.
Using the object eraser, we're able to remove an object, such as some unwanted object, and AI will use the surrounding pixels will be used to fill in the gap.
Using the simple eraser, we're able to remove the closer rocks and then use an auto-fill option to fill in the spots that the rocks were previously occupying. We made it such that where there were once rocks, our AI image generator simply substituted more fire. We also made further edits to the fire itself, as there was sometimes some unwanted additional details being added to the flames, for this we used the object eraser once again.
Splitting the image into a series of squares
The name of the game after removing imperfections on our image is to split the image into a series of smaller squares to be individually upscaled. In our case, we had an image with a width four times greater than the height, so we used four squares. This meant duplicating the image four times and cropping out the unwanted parts such that we be left with only a square.
Upscale the squares
Given our image squares, we upscale each of them to increase their individual resolution and clean them up of any overly complex details. At this point, they are ready to be recombined into a single image
Recombining the squares and eliminate the seams
In recombining the squares to re-form a single image, the flow is simple, we want to stick our squares together and, one at a time, stick them back together. We eliminate the seams between the squares by erasing the parts of the squares that are touching, leaving a bit of extra room at the foot and head of the seam to allow for the generative AI to fill in the gap between the squares and get a little bit creative with how it repieces the images together.
We repeat this process for all four of our squared images.
Once this is done, we have our beautiful background image!
We hope you've enjoyed this installment of our devlogs! Please contact us at contact@outhoused.me


Congratulations, keep it up!
Thank you very much!