The flowgraph is one of the biggest difference compared to sandbox 1, It allows you to visually script your map. You can make AI's patrol, go from on side to the other and even die instantly when they spot you :p
Flowchart (FG) Basics
Before we start off, lets take a look at the flowgraph window:
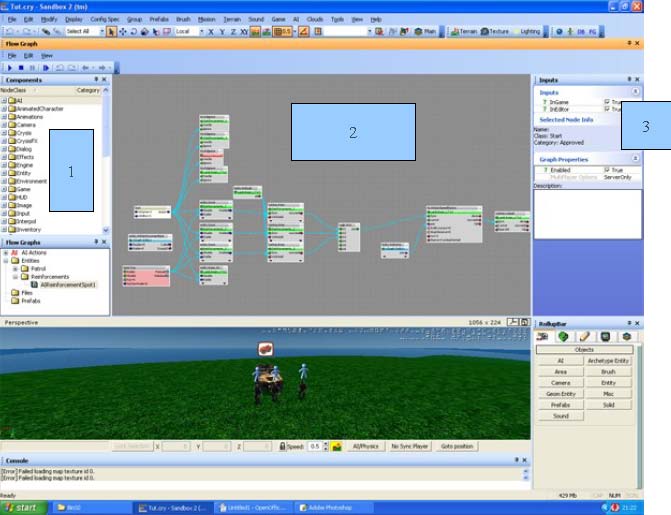
- The components window: this window contain all the nodes that make up your flowchart
- Main FG window: here you will place your nodes and connect them to script the map
- Inputs window: here you can manually fill in some side data
You will probably see this window a lot when you want to make a good map since a lot can be done here, but more on that later. Lets first look at a node:

These are the main parts of a node. You can make a connection by dragging the appropriate arrow from the output to the input of the next node, its just that easy
So lets start making something simple. First input an AI into your map, it doesn't matter which one Select your AI and go to the entity properties.You can start by giving the AI a descriptive and unique name. (I called it TutAI) Then Click the create button in the flowgraph section of the entity properties.
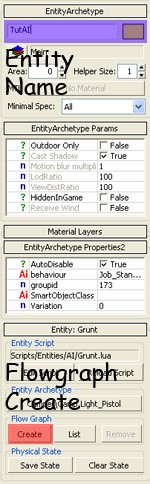
A dialog will pop up asking which group you want the FC in Click the new button and give a descriptive and unique name Position and resize the FG window so that you can still have a decent view of the viewport window After that, select your newly placed AI Right click in the FG window and select "add selected entity" If you don't see anything, don't worry you haven't done anything wrong. Right click in a empty spot and select "fit graph to view"this would give you a big view of the entity node. Now is a good time to talk about navigation and controls of the FG.
The right mouse button will pan across the FG grid The scroll wheel zooms. Adding nodes can be done in 2 ways:
- Right click menu > add node - Dragging a node from the components window to the GF main view You should also first enable all the hidden nodes. You can do this by selecting view in the toolbar and enabling all the options in the components submenu.
First Steps and further
So lets start adding something. Add the following:
- misc>start - input>key After you added the 2 you can link them: The output of the start node goes to the diable input of the AI entity The pressed output of the key node goes to the enabled input of the AI entity Now select the key node and go to the inputs window Enter a key (that is not used for anything like use, fire, crouch,...) Now you can close the flowgraph window and navigate to your placed ai in the viewport and press CTRL+G to enter the in-editor game. So the ai wont show up (if he does, you did something wrong) now, press the key you settled in the input window of the FG window and BOOM! There he is. Shoot him before he knows what happened :o
Ok but for now we are going to let him ignore us. So remove all nodes except the start node. Add a AI/AIIgnore node and assign your AI to it. You do this by selecting the AI Entity in the viewport and do "assign selected entity in the right mouse button menu on the ignore node. If you go into the game now you see he will just stand there and ignore you. So this is perfect for testing our next things.
We will now let him walk around some. So first to one spot, then a 3 way random patrol. But first things first, we will let our AI walk to one place.
So close the FG window and go to the object creation tab/AI/TagPoint. Place the tagpoint a reasonable distance away (not to far tough) Give the tagpoint a name in the entity properties (i called mine WalkToTag)
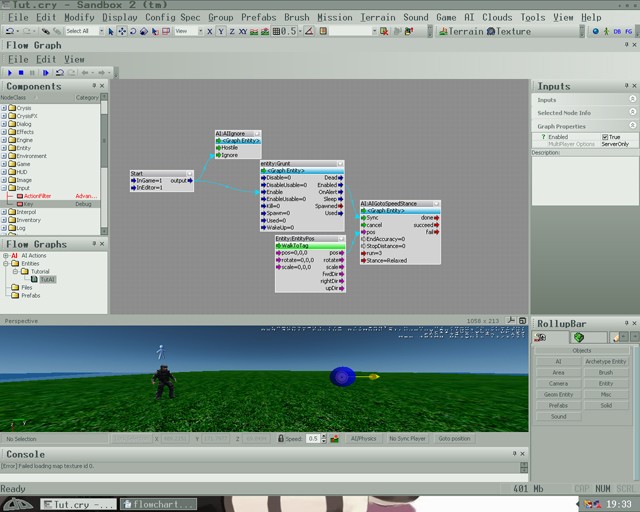
Now open the FG again (select the AI and press the open flowgraph button in the properties) And recreate this flowgraph entity:grunt can be placed by selecting the AI and and click "add selected entity"
this can be done with a lot of entities (including cars, etc...) ai:aigotospeedstance can be found under AI entity:entitypos can be found under entity.
so after you made this, press CTRL+G and look ingame. The AI will walk from one place to the other and stop. So lets add a second point and make the AI choose a random point to go to each time he is spawned. I renamed the first Tag to "Tag1" and made a new tag called Tag2. Don't worry, the first tag also gets renamed in the flowgraph window.
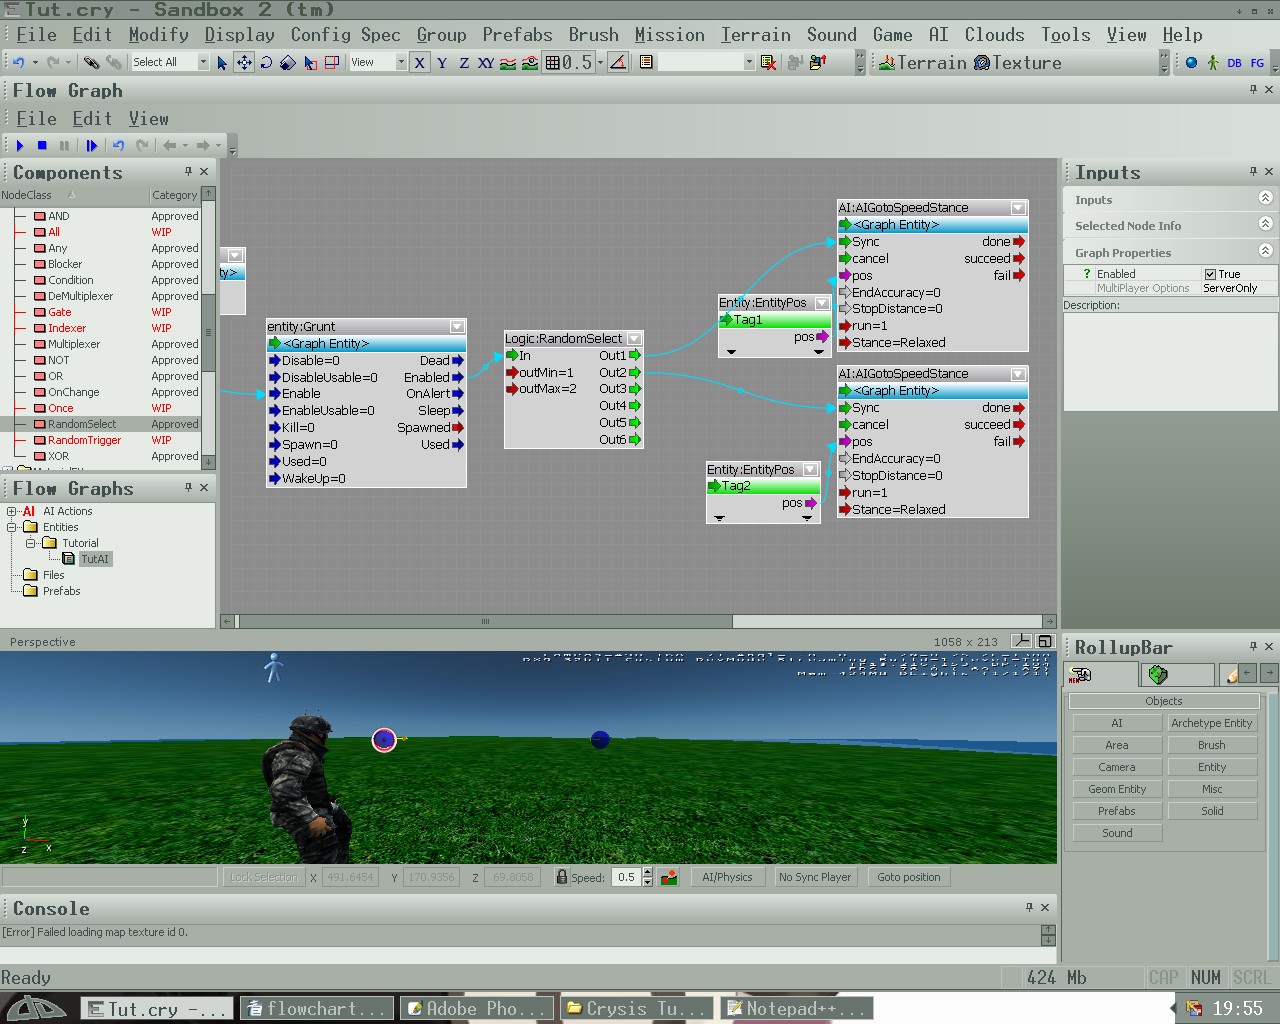
Recreate this FG. Don't forget to set the outMin and outMax of the Logic:RandomSelect to 1 and 2. Now try it out a couple of times. If you have done everything right you will see that he randomly chooses one of the 2 points.
NOTE!: If you want to make him sprint, select the gotospeedstance node and change the number after run to one of the following:
- Walk
- Fast Run
- Sprint
Now we will let him randomly patrol between 3 points. So add another AI Tagpoint behind him or so and call it "Tag3"
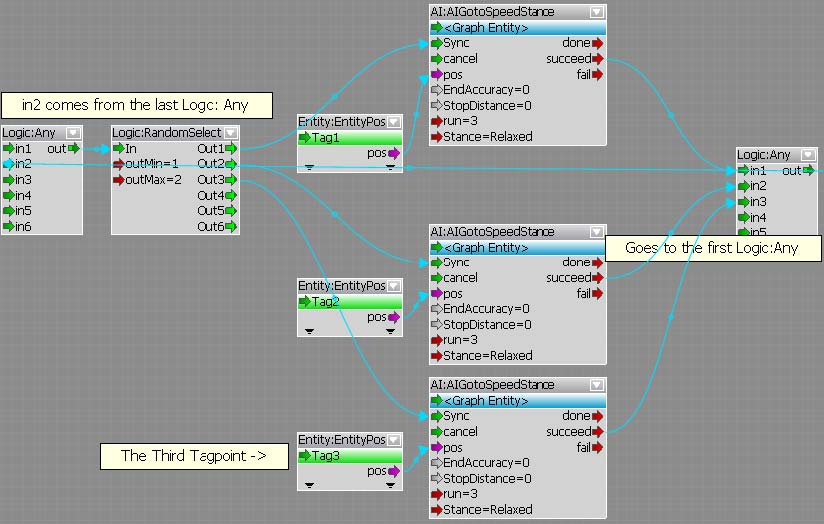
Recreate this FG I commented some stuff that may be unclear (mainly the output of the second Logic:Any) The in1 from the first Logic:Any comes from entity:grunt but you should allready figured that out.
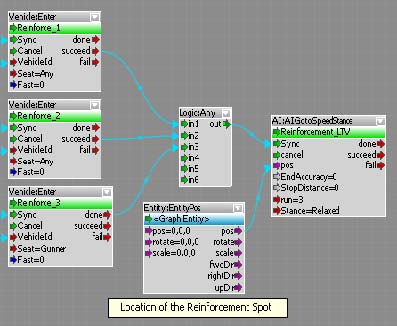
So try it out ingame using CTRL+G If you did everything right he should patrol randomly between those 3 points for...entity. But that's not very exciting is it? So lets add some reinforcements when you are spotted (along with a key which makes the AI stop ignoring you)
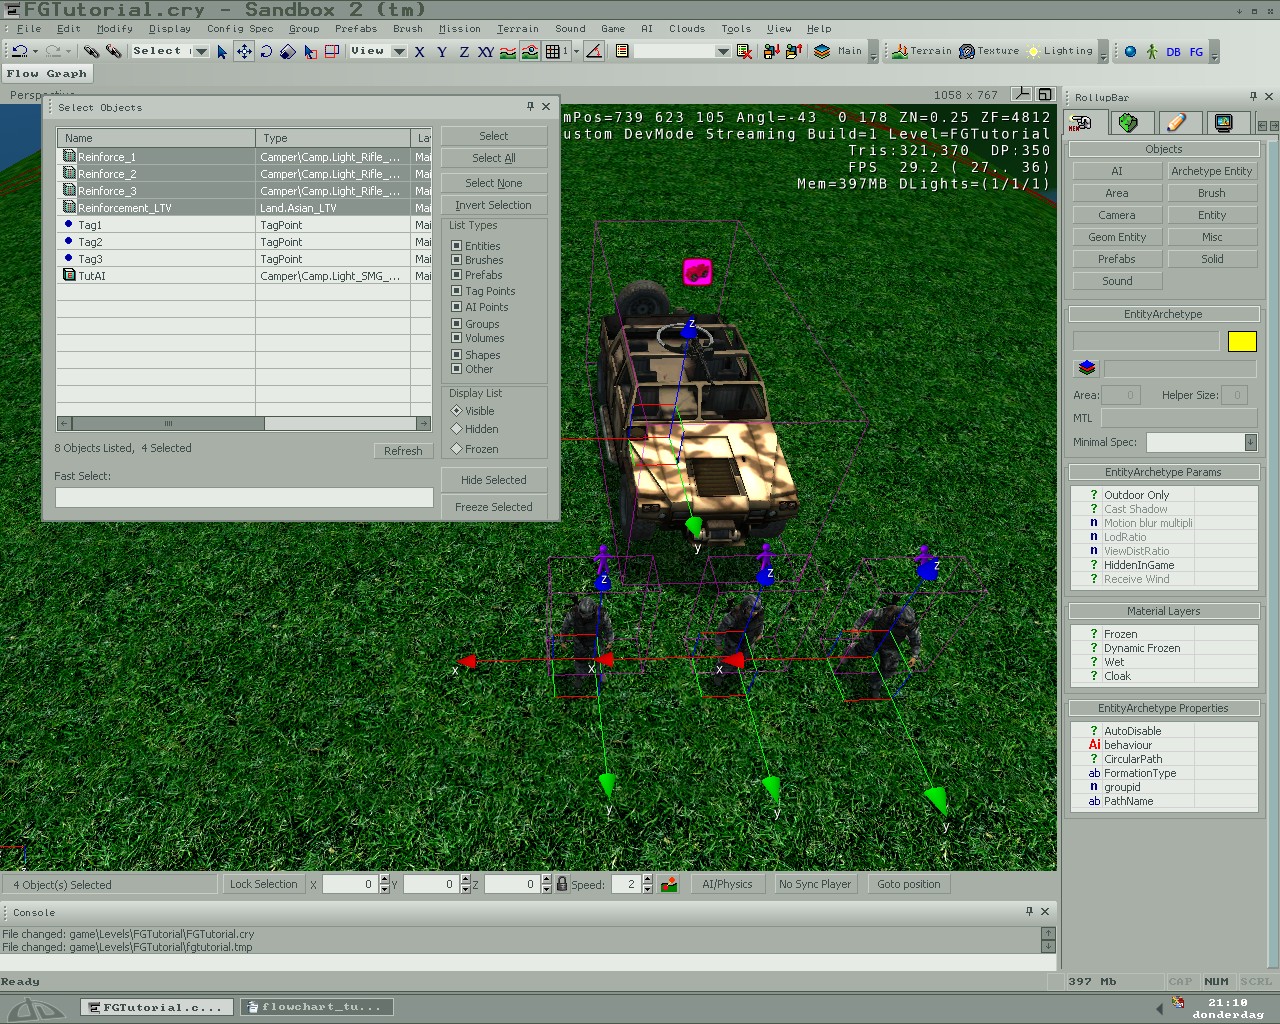
So lets start by placing the reinforcements. Place 3 AI's and give them a name (i called them Reinforce_1, 2 and 3) Also place a Asian LTV (found under Archetypes/Vehicles/Land/Asian_ltv) and give it a name (i called it Reinforcement_ltv) Here is my setup:
Also place a reinforcement entity (found under AI(button)/AIReinforcementSpot) Place it close to our patrolling guard Btw, note the 2 half spheres? Make sure the patrolling guard is in the yellow one. Now go to the properties of the entity and give it a name and change the reinforcementtype to one of the following.
- Wave (AI will wave to draw attention)
- Radio (AI will call reinforcement by radio)
- Flare (AI will shoot off a flare)
- Smoke Grenade (AI will throw a smoke grenade)
Note!: To let him throw a smoke grenade, give him one in his equipment pack
We will now need to create the FG for the event. I will guide you trough it step by step Also a little tip when creating a big FG: Go step by step, create a piece and then add to it. Don't try it in one try
So create a FG on the reinforcement spot (mine is called "ReinforcmentSpot1) and give it a new group name(since the name is for managing purposes as far as i know (managing as in handling a lot of FG's))
So first add all of the reinforcement entities (should be 3 ai's ,1 vehicle and the reinforcement spot) Also add a start node (misc/start) Now connect the output of the start node to the Disable input of the entities and the called output to the Enable input of the 3 AI's and the vehicle This will make them invisible one game start and visible when the patrolmen calls for reinforcements. So lets first set up some testing.
Open the FG of the patrolmen again (can be done in the left menu of the FG window) And make these changes:
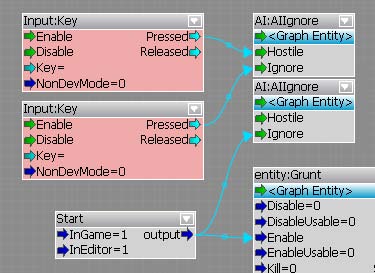
Don't forget to set 2 different keys (i forgot when taking the screen) This will make the AI ignore you on start, hate you when pressing the top input:key and ignore you again when pressing the bottom input:key So try it out The AI should run to the reinforcement spot when he sees you, let him go and wait until he fired the flare (or issue the other command set in the entity properties) Then kill him or make him ignore you(just make sure that he finishes calling the reinforcements). Look at the spot where you placed the reinforcements, they should have appeared and stand there, lets do something about it shall well.
So go back to the FG of the reinforcement spot. First thing they should do is getting in the car. So add this:
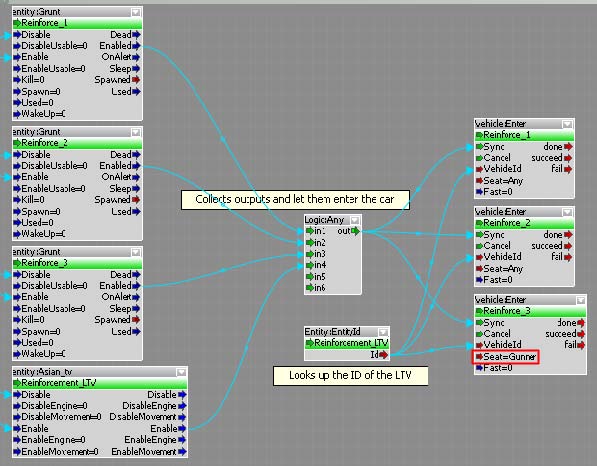
So recreate this. I did add something out of the screen tough: i added a input:key and attached it to the enable inputs of the AI's and the car so that when i press K (in my case) the event starts without reinforcements have being called. Also, if one of the AI's doesn't wants to enter the car, change the options to force him into a certain seat (in this case the gunner seat, circled in red in the above figure)
So now they are in the care and just stay there (except the gunner who starts shooting you) So lets add the following:
No were getting somewhere (at least they do) But when they arrive they do...nothing? Lets fix that:
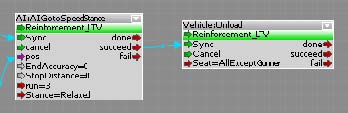
There, done. Note the Seat=AllExceptGunner? Does what it says, makes sense to. He will only exit the vehicle when he is in danger or we tell him to :p So what can be done now? Maybe some tweaks or improved realism, see for yourself I however am moving on to the next part of the tutorial: HUD Effects. Don't forget to reconnect the reinforcement entity to the AI's and the vehicles enable input. I'l maybe make another tutorial which goes more into the AI tactics and so, not sure tough.
Note!: You can also make them follow a path to the destination but for some odd reason it doesent want to work so i used tagpoints.
HUD Effects
We will continue with the example of the reinforcement-calling-randomly-patrolling-guard (just had to type it.) We will create the following scenario: When he sees you your suit will go offline (making the upcoming battle pretty hard) After all of the reinforcements are dead, your suit will reboot and receive a message
So lets start, open up the FG of the patrolling guard and recreate this:
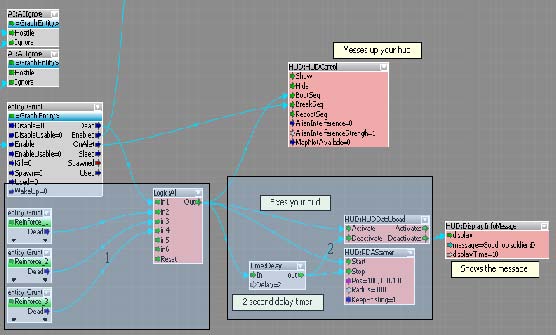
So here is some explanation: There are 2 main parts:
- Triggeringthe right conditions If you follow the onAlert output you will see it comes to the BreakSeq input (wich breaks the hud) Then the logic:all > it checks to see if all the AI's are dead and then starts 3
- The Fixing Sequence well its pretty self explanatory The timer however is just there to make the dataupload last 2 seconds and start the PDAScanner after that time Then comes the message and its mission over soldier.
So this is the end of this tutorial. Hope you learned something from it. If you want a tutorial requested you can send me a pm or comment on moddb or send me a email.

BTW, before leilei starts harassing me again :p yes i ran a spellchecker and it didnt gave any errors :)
Your ignore commands are not working at all for some reason. Click entity, go to all ignore node in the flowgraph, and select "assign selected entity" and he still runs away from me then starts shooting still. :/
have you connected it to the misc:start node?
i cant check here but il look when i am back home
I can't find the Input:Key Node. I look and there isn't even a category/subcategory for "input". I know I am doing something stupid, but can you please help me. How do I find this node?
You need to enable all the categories.
ahh help i dont want to pay to read this please explain why i cant just read it?
...
This comment is currently awaiting admin approval, join now to view.
This comment is currently awaiting admin approval, join now to view.
Does anyone know how to calculate a scalar product in cryengine 2? I want to calculate the angle between 2 positions.
My goal is to follow a specific (moving) point with a TagPoint turn.
Thanks!
Ok, fine. I found it. Entities:LookAtEntitie I don't no why can't see this befor. :D Thanks.
if you see this comment, please tell me how I can create a custom node to use in the flow graph editor, in cryengine 2, if you know about it, ok?, I want create a custom node for use in editor