I've gotten a lot of kind words about the look of Instant Dungeon! so it seemed like a good idea to share some knowledge about how it was all done. To that end, here is the first part in a series of articles detailing the tech behind Instant Dungeon!
First a quick introductory note on platforms, SDK, languages, etc. Instant Dungeon! was written in C# using our custom with the love engine. The engine uses SDL Dot Net and OpenTK for the Windows build and PSM SDK for the Playstation Mobile build. Shaders were written in GLSL for the windows build and CG for the PSM build.
Now about the art in the game, almost everything I know about pixel art I learned from hanging out at OpenGameArt.org:
Opengameart.org
It's great site, filled with talented artists freely donating their work and knowledge for all to share.
If you haven't checked it out, you are encouraged to do so ASAP.
Moving on to tech, if there's a cheat to the game's retro pixel art look, it's definitely the lighting system. The game uses a decidedly modern deferred lighting system, though one that has been simplified to just what's needed for 2D. The render process is three step.
First all the sprites and tilemaps are rendered to one offscreen buffer, let's call this the 'diffuse buffer'. Next, all the lights are rendered to a 2nd offscreen buffer, let's call this the 'light buffer'. Finally, the two buffers are combined with a multiply operation.
You can see the three stages in here:
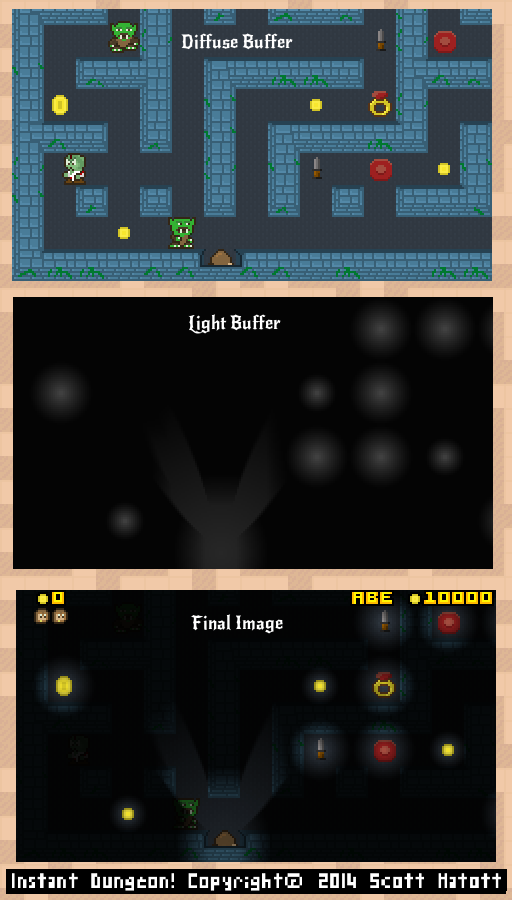
If you look closely, one thing you'll notice is that the light buffer is much darker than you'd expect from just looking at the final image. That's because the light buffer is actually multiplied by a factor of 4 before being applied to the diffuse buffer. Conversely the value of each light is divided by four before it is added to the light buffer.
What's the point of this? You could call it a sort of poor man's HDR.
By default, all color values in an OpenGL texture are taken to range from 0-1, this little operation rescales them to a range of 0-4.
If we didn't take this step, lights would only be able to darken a scene, since 0-1 times any value will always be less than or equal to that value. By rescaling the lights to a range of 0-4 we allow them to brighten pixels in the diffuse buffer as well as darken them.
Of course, there is a down side to this. The image buffer is an RGB8, meaning 8 bits or 256 possible values for each color channel per pixel. The rescaling trick changes the meaning of these bits, but it can't change the number of them.
Instead of a range from 0-1, with a minimum step of 1/255, the rescale gives us a range from 0-4 with a minimum step of 4/255. It's a broader range, but it's also a less precise range.
The visual result of this is color banding and the loss of smooth gradients in the light buffer. Since the lights in the game pretty much are smooth gradients this should be an issue. However, in practice the effect is quite muted. Mainly because there aren't really enough pixels to show a 255 value gradient in the game, so dropping to 64 value gradients doesn't lose much.
An alternate solution would have been to use a more advanced frame buffer format like RGB16F (16 bits, floating point) but such modes are not supported on the Playstation Mobile platform which uses the OpenGL ES2.0 spec.
By the way, the factor of 4 is arbitrary, I chose it empirically as the highest value that didn't produce any noticeable banding in the lights.
Moving on, the lights in the scene are all point lights, defined as a point with a radius of impact and an attenuation factor. They're rendered with simple quads and a shader that calculates each pixel's distance from the light's center and attenuates it's color value accordingly. Importantly, they are rendered with an addative blend mode, so each light adds it's color to the light buffer.
As a neat, if more technical, note on how the system is simplified for 2D, the lights are sent to the vertex shader without z-values. Instead, the vertices x and y values are given as the world space xy coordinates of a box around the light.
This box is easy to calculate for a point light, as it's just the center point of the light plus the four vectors (r,r), (r,-r), (-r,r), and (-r,-r) where r is the radius of the light. The zw coordinates are for the light's vertices are given as either (1,1), (1,-1), (-1,1) or (-1,-1) depending on which corner of the quad the vert represents (top right, bottom right, top left, and bottom left respectively).
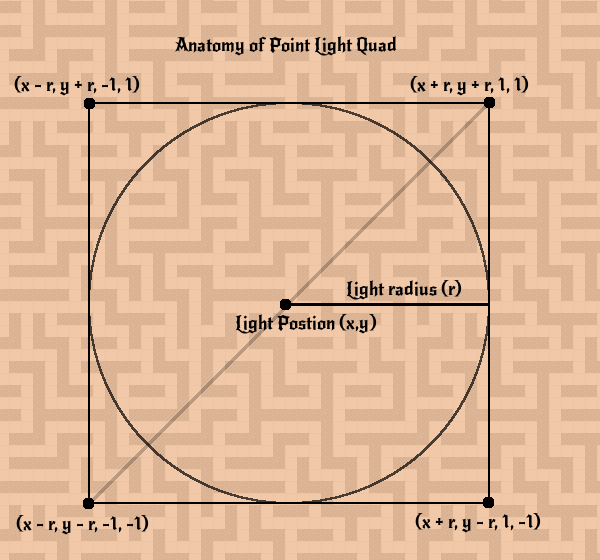
The vertex shader just adds a z of 0 and a w of 1 to the xy values and runs it through the standard model-view-projection matrix to get projection space coordinates for the verts.
The zw or 'corner' coordinates for the vert are passed along to the fragment shader.
Since the corner coordinates define a unit box around the light, to calculate the light's linear attenuation the fragment shader needs only take the length of the corner coordinate it receives and clamp it to the range 0-1. This is the same as taking the distance from center of the light and dividing by the radius of the light. This linear attenuation factor is then run through the pow function with the light's attenuation factor as the exponent. Though by no means a complete light model, this allows for a wide variety of results with a pretty simple rendering setup.
Returning to my original point, passing verts down without z values is made possible because lights are defined as 2D elements, making their z-values superfluous. To finish the illustration, here's the complete GLSL vertex and fragment shaders for a point light in the game:
// Point light vertex shader
in vec4 aPosition;
in vec4 aColor0;
out vec2 ex_Offset;
out vec4 ex_Color0;
uniform mat4 uModelViewProjMatrix;

void main(void)
{
	vec4 pos;

	pos.xy = aPosition.xy;
	pos.zw = vec2( -0.5, 1.0 );
	gl_Position = uModelViewProjMatrix * pos;
	ex_Offset = aPosition.zw;
	ex_Color0 = aColor0;
	return;
}
// Point light fragment shader
in vec2 ex_Offset;
in vec4 ex_Color0;
out vec4 out_Color0;
void main(void)
{
	vec3 lcolor;
	float dist;
	float attenuation;

	dist = length( ex_Offset.xy );
	dist = min( dist, 1.0 );
	attenuation = pow( 1.0 - dist, ex_Color0.w );
	lcolor = ex_Color0.rgb * attenuation;
	out_Color0 = vec4(lcolor,1.0);
	return;
}
One final note, notice how the light parameters are all tightly packed into vertex data instead of uniform data? This allows lights to be bundled up and rendered as one big batch of quads instead of being rendered one at a time.
Ok, enough clever shader programming talk, let's get to what really matters:
How does this tech serve the gameplay?
Using a deferred lighting system capable of handling so many lights allows for each treasure, power-up, key and door to have their own light. This not only serves to highlight these items to the player, but also, as the dungeon darkens, it yields the natural tension of the player being able to see an item but not the path to it.
Additionally, defining the light properties in terms of parameters (as opposed to say textures) allows the lights to be easily animated, as is the case with the fireball, lightning and torch lights. I guess that's still just a visual use of the tech and not strictly a gameplay use, but hey it makes it look hotter and hotness has gotta count for something right?
Speaking of hotness, if you sat through all of that you really deserve some, so here's a cool animated gif of Instant Dungeon!'s hot lighting in action!
If you want to live this hotness for yourself, you can check out the full game and demo out at:
Capbros.itch.io
That's all for this talk, stay tuned for the next one: Shadows!
* Legal notice, the code snippets above are provided free, public domain, etc. Do with them as you please.


Very cool!
One question, though: I assume the player's light does not use this standard point light shader, as I don't see anything that would lead the walls to occlude light. How was this accomplished?
- Craig G.
Yeah, the player's light uses a 'point light with shadows' shader.
That's one will be covered in detail in Tech Talk #2 - Shadows.
So stay tuned!