I have been wanting to learn about shaders for source for a while now, but the content that was available to me (including the other shader tutorials here on moddb) was very confusing, so i decided to share what i found out. Also this tutorial is about teaching, not giving out code, so please don't ask for it.
For the shader compile to work, you need to have Perl installed, so get ActivePerl and install it from here. You will also need the DirectX SDK if you do not already, which you can get here. Add the include, bin, and library paths to your Visual Studio. If you do not know how to do that:
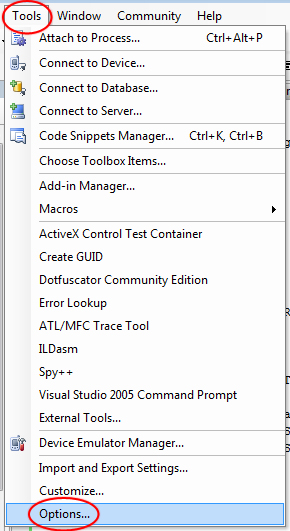
Go to Tools -> Options:
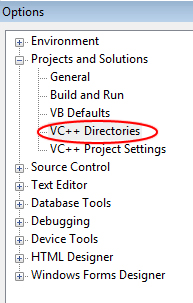
Then go to Projects and Solutions -> VC++ Directories
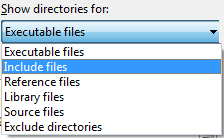
And add your directX directories. You can change from executables to includes or libraries by going here:
Navigate to:
~MOD_SOURCE~\materialsystem\stdshaders
and double click on
"stdshader_dx9-2005.sln"
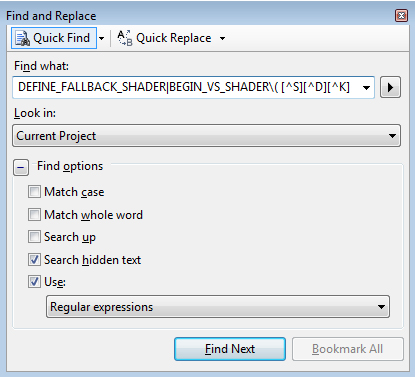
Now since the shaders were updated and the code was not, we first have to fix some things. We need to change the names of alot of the shader names to put an SDK in front of it. The easiest way to do this is press "ctrl+F" (find) enter in this for the "Find What" box:
DEFINE_FALLBACK_SHADER|BEGIN_VS_SHADER\( [^S][^D][^K]
And set the rest of the params to look like this:
Now keep pressing "Find Next", and with everything it finds, before the shader name, add "SDK_" (no quotes) so for example: BEGIN_VS_SHADER( Refract_DX90, "Help for Refract" ) would become BEGIN_VS_SHADER( SDK_Refract_DX90, "Help for Refract" )
The very basics of what a shader is is almost always two parts:
- Pixel Shaders - Modifies each rendered pixel
- Vertex Shaders - Modifies each rendered vertex
Shaders can be programmed with several languages. The common ones are:
- GLSL - OpenGL Shading Language (OpenGL)
- HLSL - High Level Shader Language (DirectX)
Since we are using DirectX for the source engine, we will be programming in HLSL. There are several types of shaders:
- Post Process - shaders that simply affect the entire screen
- Per Object - shaders that are applied to objects.
The basic shader structure is within 3 files:
- TestShader_ps20.fxc - "ps" being "pixel shader", 20 being the shader version.
- TestShader_vs20.fxc - "vs" being "vertex shader", 20 being the shader version.
- TestShader.cpp - the shader configuration file.
TestShader.cpp is the only file that will be compiled with the stdshader solution that you should still have open. the .fxc files are separate and will take another technique to compile. However all of these files go in the same directory, the one you should still be in: ~MOD_SOURCE~\materialsystem\stdshaders
Some things to keep in mind while coding in HLSL. When using float2,float3...etc, that simply defines how many variables are held inside of it. For example:
float2 pos = {value_1, value_2};Now if i had 3 values in float2:
float2 pos = {value_1, value_2, value_3};It would return an error during compile, I would need to use:
float3 pos = {value_1, value_2, value_3};When getting values FROM a variable, you would use something like this (say you wanted to get value_2 from a float3, there are multiple ways, all can work):
float val = pos[0];
float val = pos.x;
Or i could EVEN get two of the 3 parameters:
float2 val = pos.xy;That now holds:
{value_1, value_2};Now you can use tex2D or tex3D.... etc for sampling texture data. here are the major ones:
- tex1D(s, t) - 1D texture lookup. s is a sampler. t is a scalar.
- tex2D(s, t) 2D - texture lookup. s is a sampler. t is a 2D texture coordinate.
- tex3D(s, t) 3D - volume texture lookup. s is a sampler. t is a 3D texture coordinate.
- texCUBE(s, t) - Cubemap lookup. s is a sampler. t is a 3D texture coordinate.
I am now editing "TestShader_vs20.fxc" a Vertex Shader. The main purpose of this file is sending the variables that you want to send, to the pixel shader. The 1st line that you want in your vertex shader is:
#include "common_vs_fxc.h"This adds the pre-designed shader functions and headers for ease of use. Now this part is easier to understand if you are familiar with structures of classes, no matter what language. If we were coding in C++ this part would be in the ".h" file (just to give you some reference). It is simply defining the variables, except with HLSL you don't define the functions as well. only the variables.
struct VS_OUTPUT
{
float4 Pos : POSITION;
float2 Tex : TEXCOORD0;
};
pos is going to be the position of the vertex
tex is going to be the texture coordinate.
Now we set the "Main()" function:
VS_OUTPUT main(
in float4 inPos : POSITION,
in float3 inTex: TEXCOORD0
)
{
VS_OUTPUT Out = (VS_OUTPUT) 0;
Out.Pos = inPos;
Out.Tex = inTex;
return Out;
}
In the parenthesis of the function we set the variables we want. but we put a "in " before it.
then we define an output, set the variables of it, and return it (that goes to the pixel shader). I am now editing "TestShader_ps20.fxc" . The main purpose of this file is to actually modify the screen however you wish. The 1st line that you want in your pixel shader is:
#include "common_ps_fxc.h"That IS a different file than the one we used for the vertex shader!!! Now right away we need to declare the sampler:
sampler BaseTextureSampler: register( s0 );You can use and manipulate more than 1 sampler, but for now i am just going to use 1. Since I am going to be using the variable "Color" later on, I am going to define it up here:
float4 Color;Again, for this next part we are just going to declare the variable names:
struct PS_INPUT
{
float2 Tex: TEXCOORD0;
float4 Pos : POSITION;
};
Now lets get to the fun part:
float4 main( in float4 Pos : POSITION, in float3 Tex: TEXCOORD0) : COLOR
{
// your modification code will go here.
}
Inside the main() function parenthesis i again define the variables we are getting. put "in " before them again also. That is the basic structure, go on to the next part, which is making some effects!
Time to work on Shader Effects Examples and the pixel shader, and only adding to the middle of the main() function, where i have: // your modification code will go here.
BLUR
Color = tex2D( BaseTextureSampler, Tex.xy);
Color += tex2D(BaseTextureSampler, Tex.xy+0.001);
Color += tex2D( BaseTextureSampler, Tex.xy+0.002);
Color += tex2D( BaseTextureSampler, Tex.xy+0.003);
Color = Color / 4;
What i have done here is added the coordinants of slightly off the current position to the current color and divided it by how many there are so that it averages out the brightness, creating a blur effect.
SEPIA
float4 vWeightsBW=float4(0.3,0.59,0.11,0);
float4 vWeightsSepia=float4(0.9,0.7,0.3,1);
float4 cColor=tex2D(BaseTextureSampler,iTexCoord);
float4 cTempColor=dot(cColor,vWeightsBW);
return dot(cTempColor,vWeightsSepia);
RIPPLE / UNDERWATER EFFECT
Tex.y = Texy + (sin(Tex.x*200)*0.01);
float4 color = tex2D(BaseTextureSampler,Tex);
return color;
Yar
yarb
This is a pretty comprehensive tutorial but its a shame it isn't a video but thanks its actually not half bad...
I have a quick question. Im wanting to know how to emulate a shader in game Because I wanted to use the nightvision,blood,and water drip shaders found in smod but i cant figure out how to work with them. Would i need specific code that only the maker of the shader would have witch would then make it imposible or could I do it w/ some scriptin say i just wanted to bind one to a key or to show up when hit by a bullet? any advice would be much apriciated and be kind i know nothing of shaders! :)
oh and all i have are the .VCS files like, smod_nightvision_ps20.vcs
After I finish coding my shader, how do I make it appear in the game?